Whether you're replacing a damaged component, changing a tire, or making an unexpected trail-side repair, knowing where to safely lift your Polaris Pro R can make the job faster, safer, and less frustrating.
The AGM Manual Jack Sport was designed to provide a lightweight, compact lifting solution without sacrificing versatility. In this guide, we'll show you the recommended front and rear lift points for the Polaris Pro R, along with a few practical tips to help make repairs easier when you're miles from home.
Front Lift Points
Primary Front Lift Point - Lower Control Arm
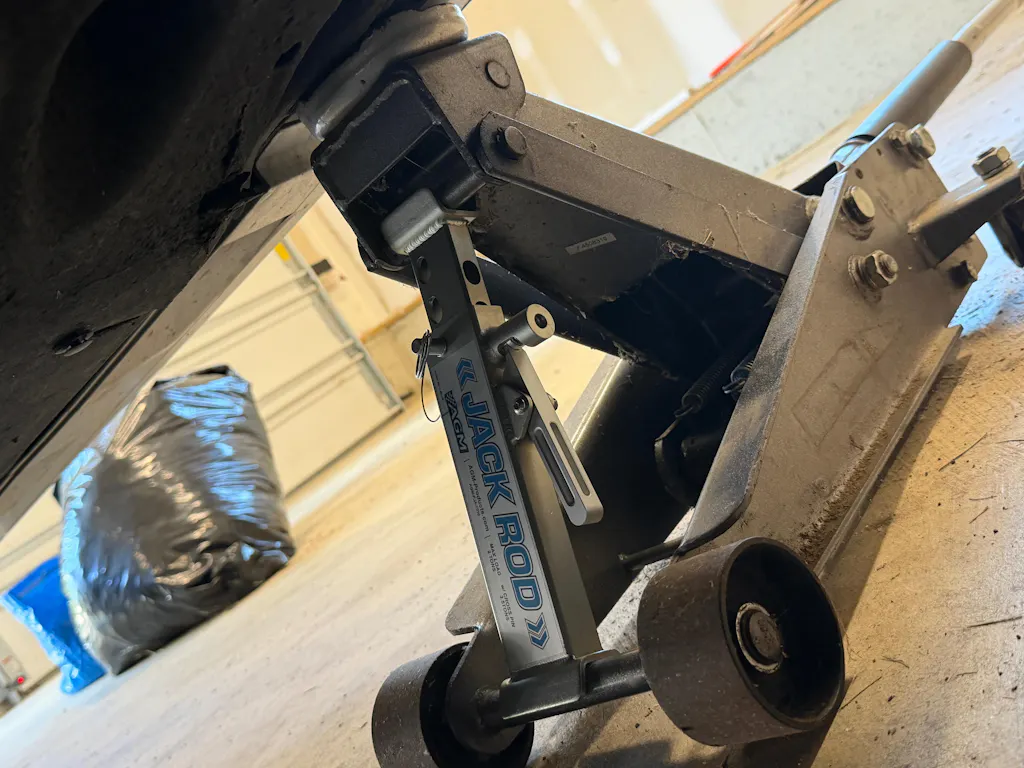
For most repairs, the lower control arm is our preferred front lifting location when using the AGM Manual Jack Sport.
The key is understanding the shape of the Pro R's lower control arm.
When positioning the jack:
-
Stay outside the centerline of the shock whenever possible.
-
Lift from the flatter portion of the arm.
-
Avoid lifting from high angled surfaces.
-
Position the jack lift pad so it follows the same plane as the control arm.
This allows the arm itself to help support the lift while reducing the chance of the jack shifting during use.
For additional stability:
-
Position the Jack, so the jack body contacts the upper control arm, if possible.
-
Verify the jack is aligned properly to the control arm before beginning the lift.
Your tire is in the air and you're ready for the repair.
Alternate Front Lift Point - Chassis Tubes
If your vehicle has significant ground clearance, your suspension is sitting at a steeper angle, or you simply prefer lifting directly from the chassis, the factory chassis tubes provide another excellent lifting location.
Using AGM's Combo Hook with the pin attachment:
-
Remove the standard hook and pad.
-
Install the pin attachment.
-
Index the pin into the factory chassis hole.
-
Position the base of the jack slightly farther inward than the top.
As the vehicle lifts, the jack will naturally move into a more stable vertical position.
This method allows you to lift directly from the chassis while avoiding suspension geometry entirely.
Your tire is in the air and you're ready for the repair.

Need More Lift Height?
If the tire isn't completely off the ground after the first lift, don't panic.
As the Polaris Pro R lifts:
-
The suspension extends.
-
The track width narrows.
-
The vehicle will remain higher in its suspension travel when lowered back down.
You can use this to your advantage.
-
Lower the vehicle.
-
Retract the jack.
-
Raise the adjustment collar one or two positions.
-
Reposition the jack.
-
Lift again.
This allows you to use the jack's travel a second time and often provides enough additional height to complete the repair.
Rear Lift Points
Primary Rear Lift Point - Rear Lower Control Arm
For most rear repairs, we prefer lifting from the rear lower control arm.
When positioning the jack:
-
Place the lifting pad beneath the lower control arm.
-
Position the GroundLoc pad of the jack slightly farther inward than the top.
-
Allow the jack to move toward vertical during the lift.
-
Use multiple points of contact whenever possible.
By lifting directly from the suspension, you avoid lifting through the vehicle's entire suspension travel.
That means less lifting, faster setup, and quicker access to the repair.
Your tire is in the air and you're ready for the repair.

Alternate Rear Lift Point - Upper Radius Rod
If access to the lower control arm is limited, the upper radius rod can also be used as a lifting point.
When lifting from the upper radius rod:
-
Use the flat lifting pad.
-
Match the angle of the radius rod as closely as possible.
-
Confirm the jack remains stable before continuing the lift.
-
Adjust the jack angle as needed to maintain good contact.
Avoid lifting from the outside of lower radius rod whenever possible. Its high-clearance geometry creates a steeper angle that can reduce stability during the lift. (the inside of the lower radius rod is also an option)
Your tire is in the air and you're ready for the repair.

Additional Lifting Options
The AGM Manual Jack Sport includes a V-groove top cap that creates additional lifting opportunities.
This feature can be useful when working with:
-
Aftermarket bumpers
-
Nerf bars
-
Other structural accessories
It can also help when additional suspension droop is needed for repairs such as axle replacement or suspension service.
Always verify the component you're lifting from is capable of supporting the vehicle's weight before lifting.
Trail-Side Repair Tips
Once the vehicle is safely lifted, a few simple habits can help prevent bigger problems later.
Keep Hardware Clean
Whether you're removing a wheel, suspension component, or driveline hardware:
-
Keep nuts, bolts, and fasteners out of dirt and sand.
-
Store hardware in a pocket, tray, magnetic holder, or container.
-
Prevent contamination of threads and mating surfaces.
Clean hardware goes back together faster and helps prevent damaged threads.
If something falls into the dirt, knock off the debris, blow out the threads, and store it somewhere safe until you're ready to reinstall it.
Start Threads By Hand
Before reaching for an impact gun:
-
Start all lug nuts and fasteners by hand.
-
Verify smooth engagement.
-
Confirm nothing is cross-threaded.
A few extra seconds now can save a much bigger repair later.
Tighten Evenly
When reinstalling wheels or components:
-
Tighten hardware in the proper sequence.
-
Use a star pattern for wheels.
-
Perform a final inspection and ensure all hardware is tightened to the manufacturer's specifications before lowering the vehicle.
Small details like these help ensure the repair stays repaired once you're back on the trail.
Two Quick Safety Tips
Move To A Safe Location
If the vehicle is still driveable:
-
Move it to a safe area off the trail whenever possible.
-
Choose flat, unobstructed ground.
-
Avoid rocks, brush, mud, or standing water when possible.
A stable work area makes the repair easier and helps keep the vehicle more stable during lifting.
Use A Secondary Support Point
If any part of your body may end up underneath the vehicle—or if you need to get back inside while it is lifted—you should always place something underneath the vehicle to act as a backup support.
Good options include:
-
Hard-shell cooler
-
Toolbox
-
Spare tire
-
Large rock
-
Log
The goal is simple: if the vehicle moves off the jack, something else is there to catch it.
That helps keep you safer and helps get you back on the trail quicker.
Polaris Pro R Lift Guide FAQs
Where should I lift a Polaris Pro R with a Manual Jack Sport?
For most repairs, the lower control arms provide the preferred front and rear lifting locations. The chassis tubes and upper radius rod can also be used in certain situations.
Why lift from the suspension instead of the chassis?
Lifting directly from suspension components often requires less travel because you're lifting closer to the wheel. This can help get the tire off the ground faster for many repairs.
Can I lift a Polaris Pro R from the chassis?
Yes. Using AGM's Combo Hook with the pin attachment allows the Manual Jack Sport to lift directly from the factory chassis tube holes.
What is the V-groove top cap used for?
The V-groove top cap can be used with structural accessories such as aftermarket bumpers, sliders, and nerf bars, creating additional lifting options when needed.
How do I safely lift a Polaris Pro R on the trail?
Move to flat ground whenever possible, use the recommended lift points, and always use a secondary support point if you may need to work underneath the vehicle.
Related Polaris Pro R Resources
Lift Point Guide
Additional Lift Guides
-
Polaris Pro R Lift Guide | Manual Jack Pro
-
Polaris Pro R Lift Guide | Electric Jack Pro
-
Polaris Pro R Lift Guide | Scissor Jack
Recommended Products
Premium Off-Road Jacks That Make Recovery Safe and Simple
The AGM Manual Jack Sport was designed to help make trail-side repairs faster, safer, and more predictable. By using the correct lift points and proven lifting techniques, you can spend less time fighting with equipment and more time enjoying the adventure.
Because how you lift it matters.