Can-Am Maverick R Vehicle Lift Guide
Safely lift your Can-Am Maverick R using the AGM Electric Jack PRO. Tested on a real vehicle during real trail repairs.
Estimated Read Time: 1–2 Minutes
Quick Answers
★★★★★ Preferred Front Lift: Rear side of the lower control arm
★★★★★ Preferred Rear Lift: Rear trailing arm near the shock
★★★★☆ Alternate Front: Front side of the lower control arm
★★★★☆ Alternate Front: Chassis rail beneath the door opening
★★★★☆ Alternate Rear: Sway bar end link bracket
★★★★☆ Alternate Rear: Rear chassis rail
Avoid: Plastic body panels, unsupported skid plates, hot exhaust components, unstable ground.
You're in the Right Place If...
• You have a flat tire on a Can-Am Maverick R.
• You want the safest lift points.
• You're using an AGM Electric Jack PRO.
• You want to avoid damaging your vehicle.
• You want to get back on the trail quickly.
Flat Tire Repair
• If using hand tools, loosen the lug nuts before lifting.
• Lift from the preferred lift point.
• Place a cooler, toolbox, spare tire, or similar size solid object under the vehicle as a secondary support.
• Remove the lug nuts, catching each one if possible.
• If a lug nut falls into dirt or sand, clean it before reinstalling so threads are not damaged.
• Install the replacement wheel.
• Start every lug nut by hand.
• Tighten in a star pattern.
• Torque to Can-Am specifications whenever possible. If a torque wrench is not available, tighten with an impact gun to get you home.
Preferred Front Lift

Lift Here
Rear side of the lower control arm.
Why
• Preferred front lift point for the AGM Electric Jack PRO.
• Provides excellent stability during the lift.
• Allows the jack to move toward vertical as the suspension extends.
• Reduces the lift height needed to get the tire off the ground.
Watch Out
• Rotate the collar so the hook sits perpendicular to the lifting pad hardware.
• Place the lifting pad underneath the rear portion of the control arm.
• Allow the tie rod to act as a secondary point of contact.
Trail Tip
Start with the base of the jack farther underneath the vehicle than the top so the jack moves toward vertical as the vehicle rises.
Alternate Front Lift

Lift Here
Front side of the lower control arm near the shock.
Why
• Common front lift point on the Maverick R.
• Works with the suspension geometry when positioned correctly.
• Good backup if the preferred front lift point is not accessible.
Watch Out
• Rotate the collar 90 degrees so the hook is inline with the GroundLoc pad bolt.
• Angle the lifting pad slightly toward the tire.
• Rest the jack body against the upright for a second point of contact.
Trail Tip
Use the pivoting base to match the suspension angle before lifting.
Alternate Front Lift

Lift Here
Chassis rail beneath the door opening.
Why
• Useful when suspension lifting is not practical.
• Strong alternate front lifting location.
• Helps keep the lifting pad flat against the frame.
Watch Out
• Position the lifting pad beneath the lowest point of the chassis rail.
• Place the base of the jack farther underneath the vehicle than the top.
• Keep the lifting pad centered on the frame rail.
Trail Tip
Let the jack move toward vertical as the vehicle rises to reduce movement during the repair.
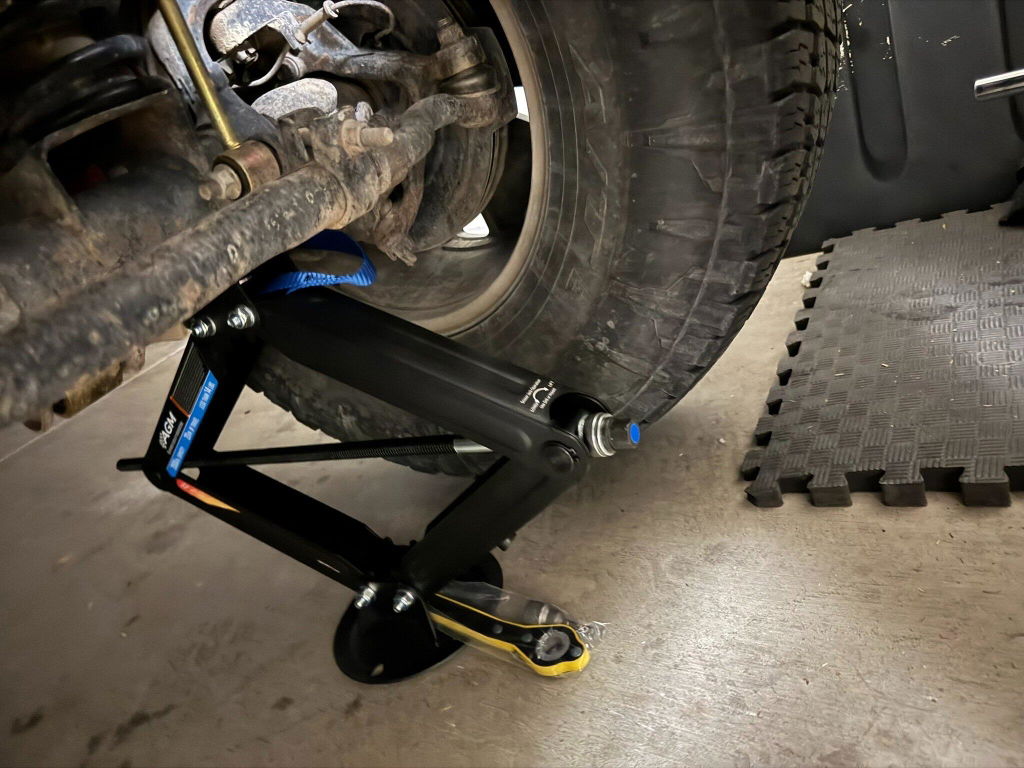
Preferred Rear Lift

Lift Here
Rear trailing arm near the shock.
Why
• Preferred rear lift point for the AGM Electric Jack PRO.
• Stable rear lifting location.
• Reduces the lift height needed to get the tire off the ground.
• Works well for most rear trail-side repairs.
Watch Out
• Position the lifting pad beneath the trailing arm.
• Keep the lifting pad perpendicular to the arm.
• Allow the top of the jack to rest against the coil spring as a second point of contact.
Trail Tip
Match the angle of the suspension and create multiple points of contact for a more predictable lift.
Alternate Rear Lift

Lift Here
Sway bar end link bracket.
Why
• Useful when access to the trailing arm is limited.
• Provides another effective rear lifting location.
• Gives good access to nearby suspension components.
Watch Out
• Rotate the collar 90 degrees before positioning the jack.
• Feed the jack between the shock and upright.
• Register the top of the jack against the spring.
Trail Tip
Confirm both contact points are secure before lifting.
Alternate Rear Lift

Lift Here
Rear chassis rail.
Why
• Useful when suspension repairs require the suspension to hang freely.
• Strong alternate rear lifting location.
• Provides better access for more involved repairs.
Watch Out
• Rotate the collar 90 degrees before positioning the jack.
• Feed the jack between the exhaust and shock.
• Verify clearance from surrounding components before lifting.
Trail Tip
Lift from the body instead of the suspension when you need the suspension unloaded for the repair.
Need More Lift Height?
Lift Here
Use the same lift point after raising the adjustment collar.
Why
• Long-travel suspension can require additional lift height.
• The Maverick R gets narrower as the suspension extends.
• A second lift can provide several additional inches of height.
Watch Out
• Lower the vehicle completely before adjusting the collar.
• Raise the adjustment collar before repositioning the jack.
• Confirm the jack is stable before lifting again.
Trail Tip
Using a second lift can preserve additional jack travel if the repair requires more suspension droop later.
Combo Hook Versatility

Lift Here
Use the standard hook or optional Combo Hook when the lift point requires a different attachment.
Why
• Adds multiple attachment positions.
• Allows adjustable lift configurations.
• Accepts interchangeable hook, pad, and pin attachments.
• Provides additional lifting options on certain vehicles.
Watch Out
• Confirm the attachment is fully seated before lifting.
• Use the correct attachment for the lift point.
• Verify the jack is stable before continuing the repair.
Trail Tip
The optional pin attachment is useful on vehicles with factory holes designed to accept lifting devices.
Common Mistakes
• Lifting from unsupported skid plate areas.
• Skipping the second point of contact.
• Starting with the jack angled the wrong direction.
• Forgetting to rotate the collar when the suspension angle requires it.
• Starting lug nuts with an impact.
• Crawling under a vehicle supported only by a jack.
Trail Safety Checklist
✓ Move off the trail whenever possible.
✓ Park on level ground.
✓ Vehicle in Park.
✓ Four-wheel drive engaged if needed.
✓ Chock a tire if necessary.
✓ Use a secondary support before putting any part of your body underneath the vehicle.
Questions We Hear Most
Where should I lift a Can-Am Maverick R with an Electric Jack PRO?
For most repairs, use the front lower control arm and rear trailing arm. The chassis rails and sway bar end link bracket can also be used when needed.
Why rotate the collar when lifting a Maverick R?
Rotating the collar changes the direction the jack pivots, helping it better match the compound angles in the Maverick R suspension.
Can I lift a Maverick R from the chassis?
Yes. The front chassis rail and rear chassis rail both provide stable lifting locations when suspension access or repair requirements make chassis lifting preferable.
What is the Combo Hook used for?
The Combo Hook allows multiple attachment configurations and accepts interchangeable hook, pad, and pin accessories for more lifting options.
Why should I start lug nuts by hand?
The Maverick R wheel studs do not feature a lead-in nose, so hand-starting helps prevent cross-threading.
How do I safely lift a Maverick R on the trail?
Move to flat ground whenever possible, use the recommended lift points, chock a tire, and use a secondary support if you may need to work underneath the vehicle.
Continue Learning
Watch
▶ Watch the Can-Am Maverick R Lift Video
Explore Other Lift Guides
Manual Jack PRO Vehicle Lift Guide
Manual Jack Sport Vehicle Lift Guide
Scissor Jack Vehicle Lift Guide
AGM Jacks For This Vehicle
Learn More
Choosing the Right AGM Trail Jack (Coming Soon)
Premium Off-Road Jacks That Make Recovery Safe and Simple.
Because how you lift it matters.